1 跑个Channel实例
1 | public void testFileChannel() throws Exception { |
其中的Buffer作为一个顶层抽象类,下面有不止八个子类,对应八种数据类型以及其他一些类型。 当Buffer,即座位在调用flip()方法之前,是写模式,即保险带是放开的,想上就上想下就下。
Buffer只是在一个改变capacity、position、limit三个值的方法(还有mark,用于临时标记position,通常用于 发送某个指定位置之后,返回到发送指定位置之前的position,因为内部提供了方法用于这个需求)。
1.1 写模式
- capacity:固定的大小
- position:初始值为0,写一单位数据就移动下一个可插入数据的单位,最大为capacity-1
- limit:额外的变量,用于读写分离。此时limit=capacity,写入的最大值
1.2 读模式
- capacity:固定的大小
- position:重置为0,读一单位数据就移动下一个可插入数据的单位
- limit:重置为position,你只能读你写了多少单位的数据。(flip()方法其实,就是将limit重置为position,position重置为0)
2. Buffer读写数据以及常用方法
除了通过Channel写入数据,还可以使用Buffer.put(),写入执行某个位置。
也可以通过Buffer.get(),读取某个位置的数据。
2.1 Buffer.clear()
limit设置为capacity,position重置为0。
2.2 Buffer.compact()
释放缓存区无用数据。当源目标为Mellow,我们已经读取了Me,现在缓存区还是Mellow,但是Me是无用的,这时候就可以调用该方法。 你可以使用 Buffer.put()以及Buffer.get()方法达到这个效果。
底层其实是将position-limit数据复制到开始的位置,并重置position = limit - position。
WHY?这个position是什么意思?其实原因在于这个方法用于:我读了Me,position为2,此时我想开始写数据,但是我以后会在某个时间点回来继续读, 则position就变成4,以后不管你写了多少,都正好不会覆盖未读数据。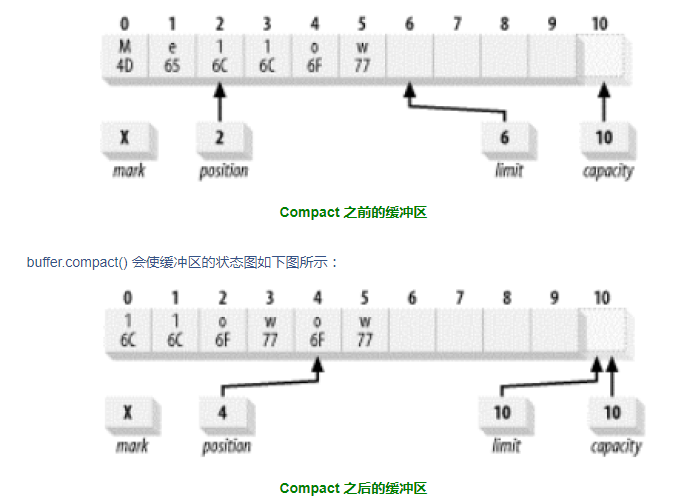
2.3 Buffer.rewind()
用于position重置为0,即重新开始写,或者读
2.4 Buffer.mark()和Buffer.reset()
mark默认为-1。 mark():将当前position赋值给mark变量。
reset():将mark赋值给position变量。
2.5 Buffer.equals()和Buffer.compareTo()
相等的条件:类型相同、剩余的单位数量相同、剩余的单位类型相同。
比较的条件:第一个不相同的元素的大小,如果都相同,则看数量的多少。
3 scatter与gather
3.1 scatter
1 | ByteBuffer header = ByteBuffer.allocate(128); |
不适用与动态消息,第一个Buffer被填充完毕之后才会填充第二个。
3.2 gather
1 | ByteBuffer header = ByteBuffer.allocate(128); |
只会有position-limit的数据会被写入。
4 Channel之间进行数据传输
1 | RandomAccessFile sourceFile = new RandomAccessFile("SourceData.txt", "rw"); |
还有一个Channel.transferTo()方法,和上面的方法相反的作用。
目标文件如果本来大于源文件,目标文件只会被覆盖源文件要传输的数据,剩余的数据还会存在。 如果count传入的时候实际大于size,则被当做count,如果小于size,则会按小于的值覆盖。查看源码即可知。
5 Selector
5.1 为什么使用Selector?
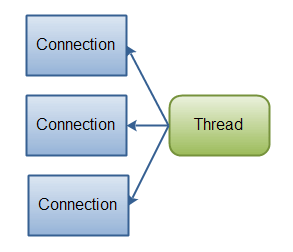
Selector是Java NIO中能够检测一到多个NIO通道,并能够知晓通道是否为诸如读写事件做好准备的组件。 这样一个单独的线程可以管理多个Channel,从而管理多个网络连接。
可以使用一个线程处理所有的通道,而对于操作系统来说,线程之间上下文切换的开销很大,Selector则是 可以处理多个Channel。
5.2 Selector使用
1 | // 创建Seletor |
与Selector一起使用时,Channel必须处于费阻塞模式下,而FileChannel只能是阻塞模式,套接字可以切换。
监听的第二个参数是不同类型的事件:
- Connect:SelectionKey.OP_CONNECT
- Accept:SelectionKey.OP_ACCEPT
- Read:SelectionKey.OP_READ
- Write:SelectionKey.OP_WRITE
监听多个事件:第二个参数输入:SelectionKey.OP_CONNECT | SelectionKey.OP_CONNECT
5.3 SelectionKey
5.3.1 interset属性
其中包含了一些你感兴趣的属性,即注册的事件:1
2
3
4
5int interestSet = selectionKey.interestOps();
boolean isInterestedInAccept = (interestSet & SelectionKey.OP_ACCEPT) == SelectionKey.OP_ACCEPT;
boolean isInterestedInConnect = (interestSet & SelectionKey.OP_CONNECT) == SelectionKey.OP_CONNECT;
boolean isInterestedInRead = (interestSet & SelectionKey.OP_READ) == SelectionKey.OP_READ;
boolean isInterestedInWrite = (interestSet & SelectionKey.OP_WRITE) == SelectionKey.OP_WRITE;
5.3.2 ready属性
ready集合是通道已经准备九局的操作的集合,你可以通过int readySet = selectionKey.readyOps()进行分别的访问, 也可以使用:1
2
3
4selectionKey.isAcceptable();
selectionKey.isConnectable();
selectionKey.isReadable();
selectionKey.isWritable();
5.3.3 Selector获得Channel
1 | Channel channel = selectionKey.channel(); |
5.3.4 附加的对象(可选)
1 | selectionKey.attach(theObject); |
5.3.5 通过Selector选择通道
- int select() 该方法会让Selector阻塞,直到至少有一个Channel在你注册的事件上就绪。
- int select(long timeout) 设置最长阻塞的毫秒数
- int selectNow() 直接返回,无论什么Channel。
返回值表示从上次select()方法调用之后,又有多少符合要求的Channel,不叠加。
5.3.6 wakeUp()
某个线程调用select()让某个Selector阻塞后,使用该方法可以立马返回,如果没有阻塞,但是提前调用了wakeUp方法, 那么下个调用select方法的线程会立即wake up。
5.3.7 遍历SelectorKeys
1 | Selector selector = Selector.open(); |
需要手动将事件给移除
5.4 完整的示例
1 | int port = 9999; |
6 FileChannel
文件通道,用于文件的读写,常用,由于FileChannel无法设置非阻塞模式,它总是运行在阻塞模式下1
2
3
4
5
6
7
8
9
10
11String str = "112中国";
RandomAccessFile file = new RandomAccessFile(
"D:\\source\\eclipse\\liwen\\src\\main\\java\\liwen\\com\\io\\data.txt", "rw");
FileChannel channel = file.getChannel();
channel.position(channel.position() + file.length()); //这行代码设置写入文件的最后
ByteBuffer buffer = ByteBuffer.allocate(48);
buffer.put(str.getBytes());
buffer.flip();
while (buffer.hasRemaining()) {
channel.write(buffer);
}
还有用于截取通道的方法:truncate(),以字节为单位。还有一个force()方法,用于强行将数据写入磁盘, 操作系统一般先将数据写入内存,再从内存写入磁盘,设置为True即可。
7 SocketChannel
1 | // 客户端连接,最后使用close关闭。 |
8 ServerSocketChannel
1 | // 服务端开启监听: |
9 DatagramChannel
用于UDP数据的发送和接收1
2
3
4
5
6// 服务端
DatagramChannel channel = DatagramChannel.open();
channel.socket().bind(new InetSocketAddress(9999));
ByteBuffer buffer = ByteBuffer.allocate(48);
channel.configureBlocking(false);
channel.receive(buffer); //将得到的UDP数据写入buffer中
1 | // 客户端 |
10 Pipe
作为两个线程之间的单向数据连接连接(Channel本身是双向,但是通过两个双向的管道一起组合实现成一个单向的,即Sink->Source)
1
2
3
4
5
6
7
8
9
10
11
12
13// 向管道写数据
Pipe pipe = Pipe.open();
Pipe.SinkChannel sinkChannel = pipe.sink();
ByteBuffer buffer = ByteBuffer.allocate(48);
buffer.put("中国人".getBytes());
buffer.flip();
while (buffer.hasRemaining()){
sinkChannel.write(buffer);
}
// 从管道读数据
Pipe.SourceChannel sourceChannel = pipe.source();
buffer.clear();
sourceChannel.read(buffer);
11 NIO和IO
11.1 面向流和面向缓冲
IO面向流,每次从流中读取一个或多个字节,直至读取所有的字节,没有被缓存再任何地方,另外,也不能移动流中的数据, 如果想移动,需要手动将流中的数据缓存在一个第三方缓冲区变量中。而NIO则本身就将数据放入到缓冲区中,可以在缓冲区 中前后移动,只是加多了对缓冲区的判断以及更多数据进入缓冲区时,不能覆盖原来的数据。
11.2 阻塞和非阻塞
本质区别,IO在读写直接阻塞。而NIO的读写的操作会直接返回值,进入下一步操作不会阻塞,并通过Selector来实现一个线程 对多个Channel,即多个读写进行管理。
11.3 数据的处理
IO的设计逐字节读取数据。例如你正在处理基于行的文本数据流: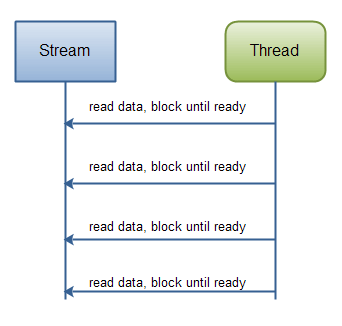
1
2
3
4
5BufferedReader reader = new BufferedReader(new InputStreamReader(new FileInputStream("data.txt")));
String nameLine = reader.readLine();
String ageLine = reader.readLine();
String emailLine = reader.readLine();
String phoneLine = reader.readLine();

1
2
3
4
5
6
7ByteBuffer buffer = ByteBuffer.allocate(48);
FileChannel channel = new RandomAccessFile("data.txt", "rw").getChannel();
int bytesRead = channel.read(buffer);
while (bytesRead != -1) {
channel.read(buffer);
}
channel.close();
12 总结
- NIO可让您只使用一个(或几个)单线程管理多个通道(网络连接或文件),但付出的代价是解析数据可能会比从一个阻塞流中读取数据更复杂。
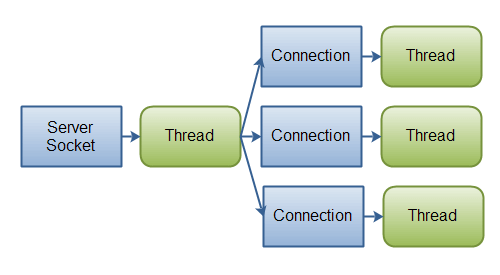
- 如果需要管理同时打开的成千上万个连接,这些连接每次只是发送少量的数据,例如聊天服务器,实现NIO的服务器可能是一个优势。同样, 如果你需要维持许多打开的连接到其他计算机上,如P2P网络中,使用一个单独的线程来管理你所有出站连接,可能是一个优势。
- 如果你有少量的连接使用非常高的带宽,一次发送大量的数据,也许典型的IO服务器实现可能非常契合。下图说明了一个典型的IO服务器设计: